Joy goes on a Mini Vacation

Joy goes on a Mini Vacation

I didn’t want to go, but I had to.
Oh, well, I did want to go to Marquette to see some of the inlaws, but not ALL of the inlaws, if you know what I mean. My husband goes every summer, and I only every other time, because I don’t think it’s right to spend all the time and effort it takes to go up there, only to endure hateful comments by one person. I didn’t go last year, so I had to go this year. and it was my MIL’s 90th birthday.
Sew I planned ahead, and made sure I didn’t repeat any of the “mistakes” I made last time. I get up at 3am every day for work, so getting up at 6am is sleeping in for me. I am not going to change my schedual for 4 days, only to have to revert back when I get home, and this seems to be a source of contention for my MIL. No matter how quiet I am, I just can’t make her happy unless I stay holed up in our room downstairs until 9am, which I just can’t do. Yes, I already told Hubby I wanted to stay in a hotel, but he wasn’t having it.
It is tradition to stay at his brother house, when one visits, and his mother visits every summer.
I brought a coffee maker, so I could make coffee in the bathroom downstairs, in hopes of not waking up the MIL, and being ridiculed for the remainder of the trip.
and I brought Joy! There is a little walk out with small table and gorgeous view, and I imagined myself sitting there sewing while watching the sun come up.

2018_Sewing_06

Sew much fun – no extension cord needed!

2018_Sewing_04

Watched the sun peeking through the trees.

2018_Sewing_03

Joy’s little corner of peacefulness.

2018_Sewing_07

With nice views in all directions, it was as awesome as I imagined!

2018_Sewing_08

I don’t know if I got it right, or if it’s because MIL had another person to be mad at [someone who should have been there, but wasn’t], but I did have a wonderful [and insultless] time!

I wore my Bag/Shirt outfits, and everyone seemed to love them!

I went to the Ben Franklin craft store, and bought some . . . . [are ya ready?] fabric! I also got a row-by-row pattern. Not the kit because it was done in black and white. Note to shop owners: If you want to sell your kits, make it in fabric that every quilter doesn’t have in their stash already. – Just sayin . . .

We went bar hopping with some cousins. Saw a live band. It was a  One Man Band. Bought the CD. Drank Craft Beer. Wished someone would carry Labat Blue!

The next day we went to a park, where I did NOT jump off a cliff, but got a picture of the cousin that did.

2018_Doug

What a pose!

2018_Doug_02

Then I went rock hunting/sight seeing by myself, while others left early to get stuff for the Birthday party. I think hubby was slightly worried I wouldn’t come back, but I had to. My rock bag was full. LOL.

2018_HangingOn

After I stuffed a grocery bag full of pretty rocks, I found an art gallery on the way home. I ventured in, and bought some greeting cards by Kathleen Conover. If I love you, yer getting one of these. Hopefully I only love 12 people cuz I am keeping 4 of them. I love her works, and it turns out she was a quilter!

The next day, I went to a real quilt shop called Alley Kats, and got a row by row pattern and a bit more fabric. They had some Kaffe, but not in the colors I needed.

SIL took me to a retro store called  Boomerang Retro & Relics and it was so cool, I had to take a picture of the shop keeper! I coulda done some damage if I didn’t have to pay for our car repairs before we went.

2018_Boomerang

I finished all my blocks for a pattern I am making from charms, and ended up having a wonderful time!

Which is good, because summer is almost over.

I hope you all are having a wonderful summer!

#JoyGoesOnVacation

Singer 99 is Dressed to the 9’s

Singer 99 is Dressed to the 9’s

Dressed to the 9’s!

In the weeks that followed my Singer 99 conversion, I accessorized a bit, then I took her to an all day sew. I usually bring a couple other machines with me, but I only used Joy that day. I marveled at her true portability, as I churned along. At first, I found myself looking under the table for the foot pedal, and laughed at myself. Once, I found my legs crossed, and told my friend, “Hey look! My legs are crossed! Can you do that?” and she mildly, said “no” Then she lit up and said “Oh my goodness! The light just turned on. That is truly a portable machine!” I smiled and said “I know, right? I can take her to the park and just sit and sew.”
Now, she wants one.
At that time I had only made a dust cover, accessory bag, and piecing tool caddy, with padded bottom [possible coffee cup mat] built in pin cushion, scissor pocket, and small pockets for tweezers, 6″ ruler, and poky stick.


Pretty cool stuff, considering I wanted to be able to carry her outside and have everything I need to begin sewing.
but then I went full out batpoop crazy, and made a custom Pack-n-Play for her!
I finished in time to take her for a test run at my local quilt shop aply named “Sew Crazy”

Joy_Pack-n-Play_01

The hooks were added because I accidently ironed over the nylon webbing while pressing the panel on, and got some black goo on the red panel. After thinking about remaking the panel for a tenth of a millisecond, I decided to hide the marks with hanging hardware! I don’t know if I will ever need to hang anything here, but no one has to know that I didn’t intend to have them.

Joy_Pack-n-Play_02

Please notice the position of the word “Singer” in the appliques.


I did not want a bag that I would have to lift her out of to sew, so I made sides that drop down.

Joy_Pack-n-Play_05

Beauty unfolding!

Joy_Pack-n-Play_06

I ran out of velcro for the side pocket flaps. I don’t have any idea what I will put in these pockets, but you can’t add them later, so here they are.


In case you can’t tell just how much I obsessed over this, here are the features:

The end pieces contain pockets with print matched flaps on the inside [of course], and print matched sleeves on the outside for the webbing straps to go through because I do NOT like spending $12 /yard for fabric and then having black straps run across the top of  it.

Joy_Pack-n-Play_Sleeves

The front drops down, and is made to hang over the table. It has 3 pockets with a print matched flap. The flap is held closed with velcro, because these pockets will be upside down when she is all packed up.

Joy_Pack-n-Play_03

The back is designed to hold patterns, paperback books, or quilt blocks, and also has a print matched flap. This flap also has a velcro closure, but will be right side up, when she is all packed up.

Joy_Pack-n-Play_04

Then we have a shape matched bag for threads, bobbins, and portable battery operated light. I designed this to fit the exact shape of her throat where it will travel with her. I used an invisable [teeth covered] zipper so as not to scratch her when I slide it in place.

Joy_Pack-n-Play_08

Then I needed a way to have the tools I always use handy, so I made this tool cozy with pin cushion, scissor pocket, and little pockets for a ruler, tweezers, and poky sticks.

[See those little red scissors? They are made by Fiskars, and cut thread really well. They only cost $1.49! Look for them in the school supplies [not sewing] section next to the crayons. I buy them in colors to match every sewing machine I have.]

Joy_Pack-n-Play_09

There is a flap on the back to put her foot down on, and hold it in place for travel.

Joy_Pack-n-Play_07

More velcro to hold her secure.

Joy_Pack-n-Play_Withoutmachine

The front has her name in fussy cut applique.
The back as an outline of her in fussy cut applique, from a template I made.

Joy_Pack-n-Play_02_Closeup

If I learned one thing from this, it’s that the ‘stick on’ velcro sucks!!!! If you have any,  throw it away! Now!

Really!

I’ll wait . . . . .

Is it gone?

Ok, good.

So what will you use to hold the velcro in place while you sew it?

Something that will make it stick where you want it, but also be able to sew over it without gumming up your needle?

Temporary basting spray! Yep!

Tip_Velcro

Here are the rest of my tips for sewing velcro:

Use a walking foot! I was lazy, and left my walking foot on, and it worked better than any of my past velcro sewing experiences! Skipped stitches anyone? Not with the walking foot. I’m telling you, it was awesome.

Cut the pieces to fit before spraying them. Then lay down the ones you will sew first, because you don’t want the pieces in waiting to get too dry. I used freezer paper for any overspray.  Spray them, then place on fabric, finger press, and sew them down.

Next, spray your matching pieces, and lightly place on top of the sewn ones.

Tip_Velcro_03

Then carefully close the flap, and if it looks good, press with your hand.

Tip_Velcro_04

Next, carefully lift the flap, using your finger tips to seperate the pieces so the unsewn ones stay stuck to the fabric. Now, you are ready to sew those down.

Tip_Velcro_05

I had so much fun, I may velcro EVERYTHING!

um, as soon as I get some more.

That’s it for this week! I am off to work on another quilt now.

#DressedToTheNines #PrintMatchObession #PackNPlay  #SewingWithVelcro


Kaffe Paperweight TeaPot

Kaffe Paperweight TeaPot

I found out that Kaffe Fasset had authorised some of his designs to be featured on  Teapots made by The London Pottery.  Sew, just for kicks, I had to get one, which led to making a tea mat. In reality, I keep the Teapot on top of my microwave, and I hated dusting it. Not the teapot, but the microwave. The microwave is black, and I could dust it several times a day if I was OCD about it. I fixed that with a FQ of Jade, and of course the matching Gypsy color, along with some black poka dot, and some Tea themed scraps.

Kaffe_Tea_Mat_Reverse

I made 2, but I couldn’t decide which one I liked more, so I made it reverseable.

Kaffe_Tea_Mat

In case you ever wondered . . . .

Kaffe_Tea_Mat_02

Yeah, that’s better now.

Something pretty to look at, and no more dusting the microwave. That means more time for quilting.

#FunWithKaffe #MoreTimeForQuilting

I cut some gorgeous fabric!

I cut some gorgeous fabric!

Odd headline, but when you consider I’ve had this large print fabric for awhile now, because it was too pretty to cut – it is very appropriate.

Sew what did I cut?

My Kaffe Fasset Collection fabric. Kaffe Spots, and Philip Jacobs Japanese Crysanthemum to be exact. Maybe it’s because the name says “cry” I just couldn’t cut it up, until I decided it was time to get pretty!

I told myself I couldn’t start another handbag until I finished my round bag for the rotating cutting mat. Well I finished it, so I got out my Kaffe Fasset collections, and made a couple of things. A shirt and handbag. The bag is a free pattern called Phoebe that was modfied by adding an inset zipper closure, a large pocket on the outside, a cell phone pocket on the side, and a divider. I later added some slides to the handle to be able to adjust the length. The shirt was “newLook” pattern #6871

My_Phoebe_Bag_Top_PJ_Japanese_Crysanthemum

I fussy cut the front and back of the shirt pieces, as well as the outside pocket on the bag  to place a big fat Crysanthemum  front and center!

My_Phoebe_Bag_Top_PJ_Japanese_Crysanthemum_02

I am pretty sure Philip Jacobs would be tickled pink!

My_Phoebe_Bag_PJ_Japanese_Crysanthemum_02

Modifed inside of Phoebe bag.

My_Phoebe_Bag_PJ_Japanese_Crysanthemum_03

Perfection!

My_Phoebe_Bag_PJ_Japanese_Crysanthemum

Sew, how do you top that?

You don’t, but every now and then your eyes need to rest from all that excitement, so you make another couple of things.


My_Phoebe_Bag_Top_PJ_Japanese_Crysanthemum2_01

Also fussy cut.

My_Phoebe_Bag_Top_PJ_Japanese_Crysanthemum2_02

Getting really good at these inset zippers!

My_Phoebe_Bag_PJ_Japanese_Crysanthemum2_03

and of course matching reading glasses case!

My_Phoebe_Bag_PJ_Japanese_Crysanthemum2

These outfits take about 2 yards of each color, and there is some left over, but that’s ok. I can use it in a quilt!

Am I doing a 3rd? You bet!

#ICutMyKaffe #LargePrintQuiltFabric


Joy Under The Apple Tree – Singer 99

Joy Under The Apple Tree – Singer 99

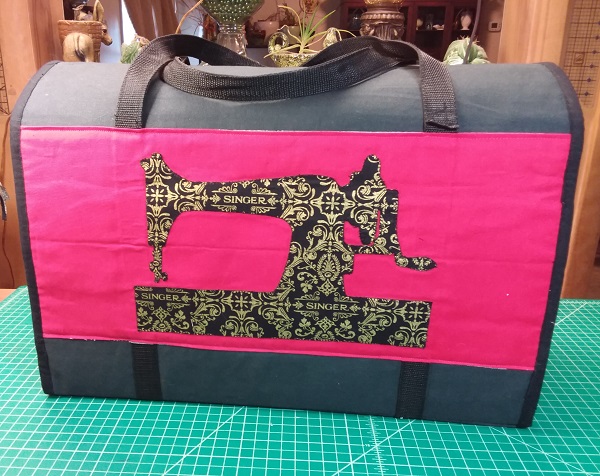
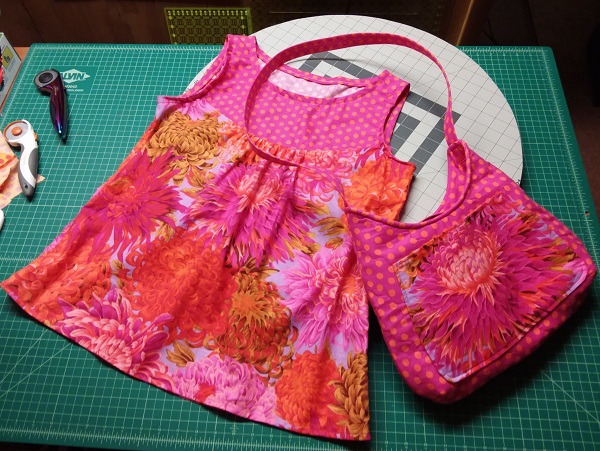
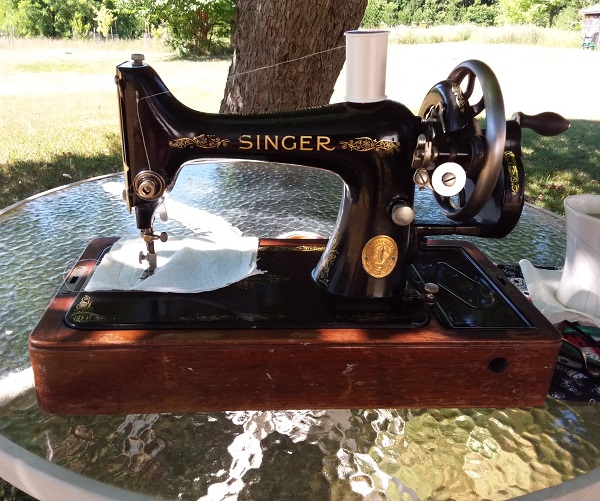
I have wanted to be able to sew outside under the big ol apple tree for quite some time, and my mind was made up! I am going to do this, this summer!
Yes, this was years in the making. I probably could have bought a handcrank by now, but they are so darn expensive.
I already had an old 128 with spoked handwheel. [check]
and I had purchased a replica hand cranky thing [check]
I started trying to clean up the 128 machine head, with rough, silvered decals [something that happens when people clean it wrong], and found it needed parts. About $50 worth of parts, and this wasn’t going to be a pretty machine. The more I looked at it, the more I didn’t want to look at it. I figure if I am going to handcrank stuff, I would be looking at the machine a lot, and I just didn’t want to look at this one that much.
So I looked for a better candidate.
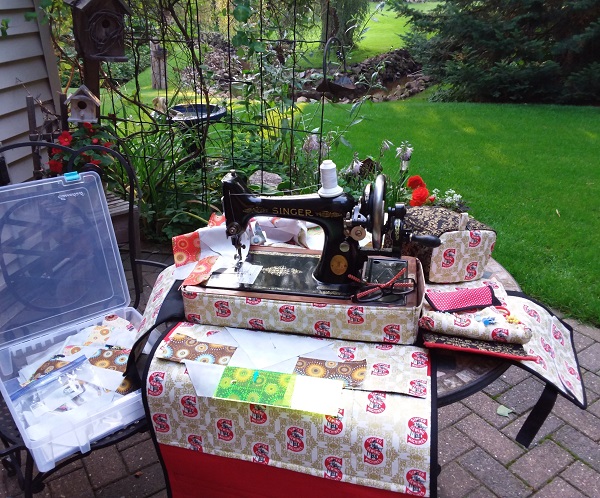
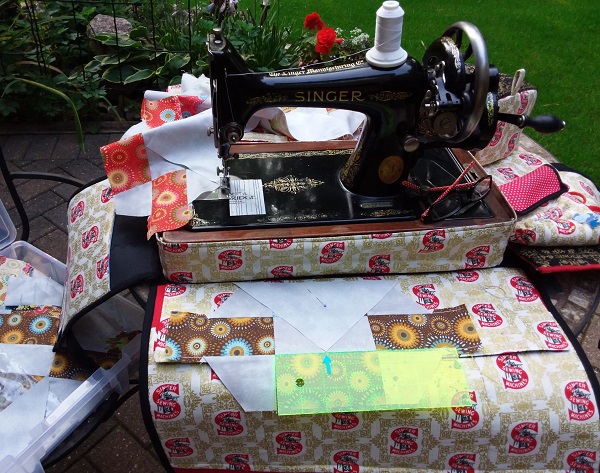
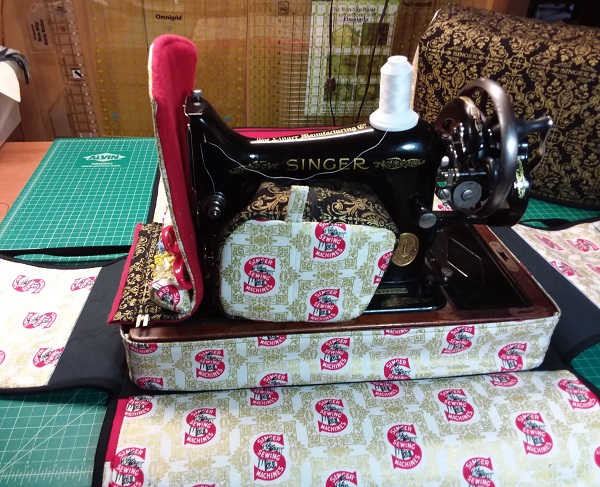
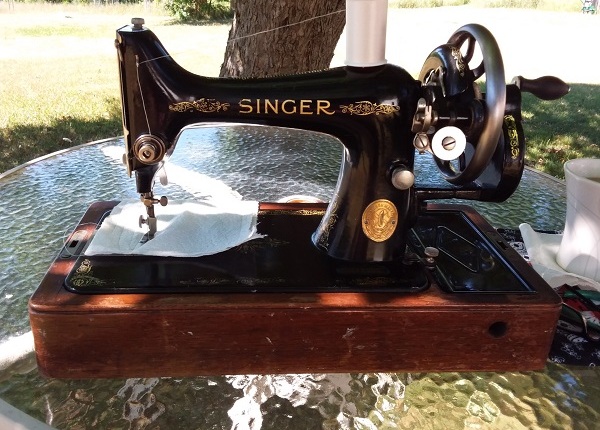
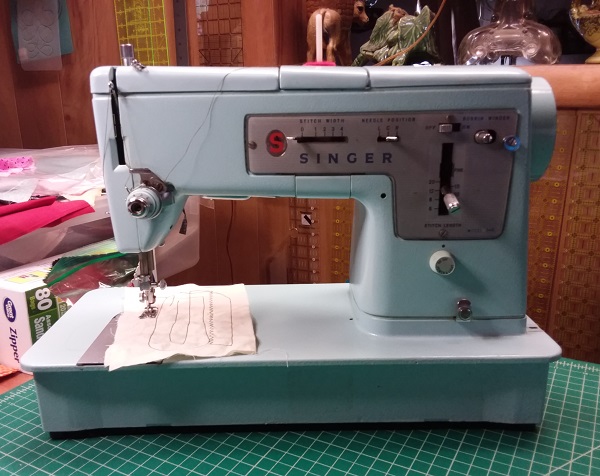
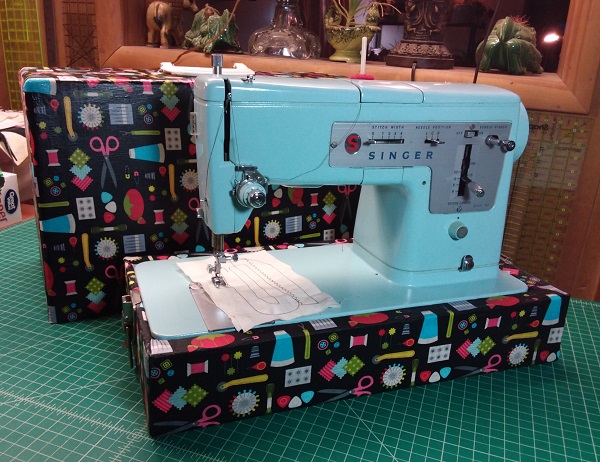
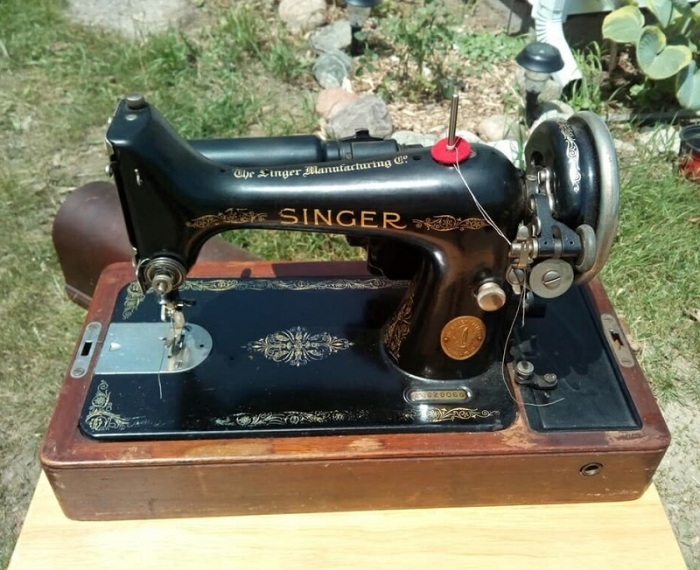
I found “Joy”
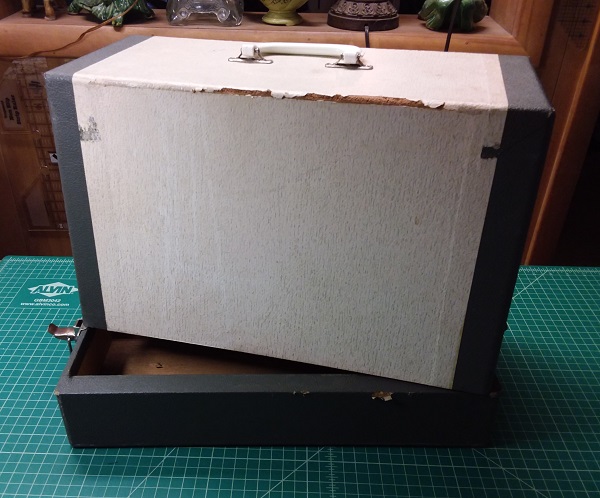
Joy is a Singer 99k with motorised knee pedal in a well-used bentwood case.
Oh the stories the Grandaughter, and Son, told me about the remarkable woman who took care of her family with this machine! How could I not name her after the previous owner?

Joy_AD628066

I got her home, and after admiring her in the sunlight, I brought her in, where I had the spoked wheel ready.
I had already sanded off the glaring declaration of my thriftyness [made in china] from  the replica hand crank, then painted over it. I had to.  The gold lettering was right on top, accusing me of spoiling one of Singers finest before I even started!

I carefully removed all the motorised parts, and stored them for safe keeping.

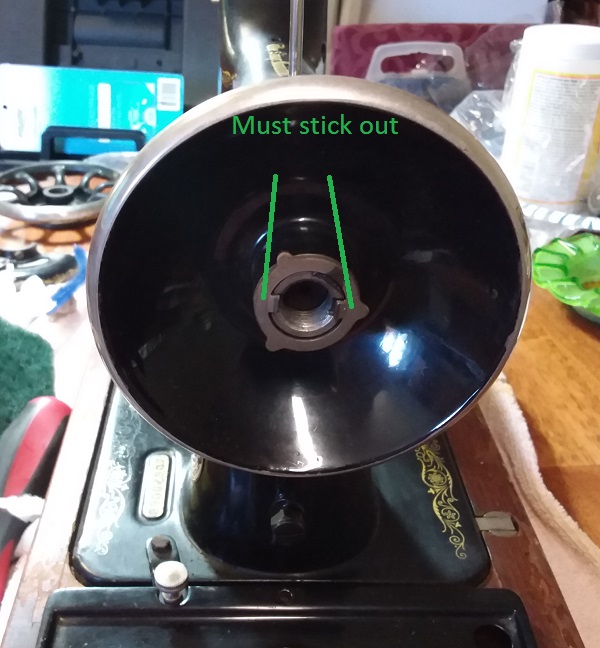
Now, the thing with coverting a Singer 99k to a handcrank that wasn’t orginaly a handcrank is, the diameter of the part that engages the bobbin winder on the spoked handwheel is smaller. There is a web page detailing the swap, where he says he removed the bobbin winder entirely because it wouldn’t work. Well, mine is going to work because I said so!
When I installed it all, and adjusted it all the way, I could see that I only needed about a quarter inch for the tire to make contact with the handwheel. If there is one thing quilters know, it’s a quarter inch!


I was going to see if I could just drill and tap a second hole where the adjustable part of the bobbin winder screws in, but found the metal too thin where it needed to be.
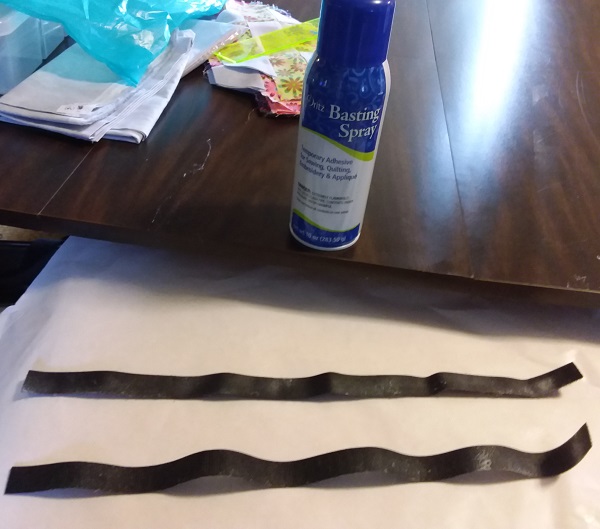
Ok, so what if I increase the diameter artifically? I think a vacuum cleaner belt would close some of the distance.

Hoover #49 turned out to be a nice, tight fit, bringing the diameter up to 3″

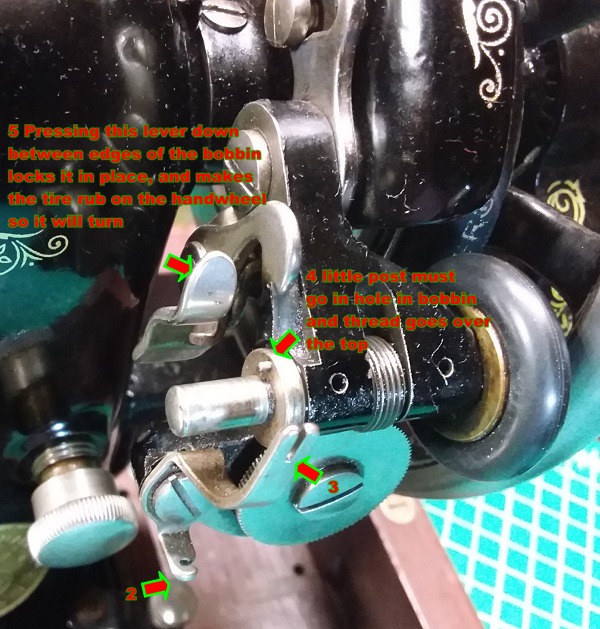
Now to elongate the adjustment slot where it bolts up, and I think we may have a winner. I sure do love my dremel – with an extensive array of accessories – my dremel is my best friend. Wanting to remove only as much as I needed to, it took 3 tries, but I got it. Joy now has a working bobbin winder!

Singer_Handwheel_Enlargement_Project_03

A new bobbin winder tire was also applied. I had purchased it for a 29-4 cobblers machine I have [but didn’t use yet], and it turned out to be the size I needed for this one.

Singer_99_Joy_Outside_02
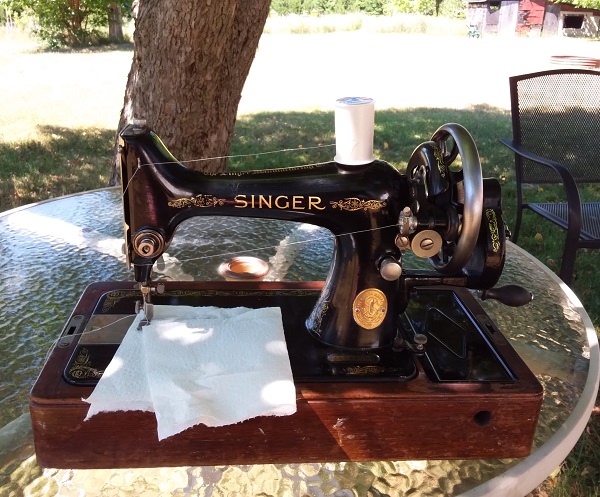
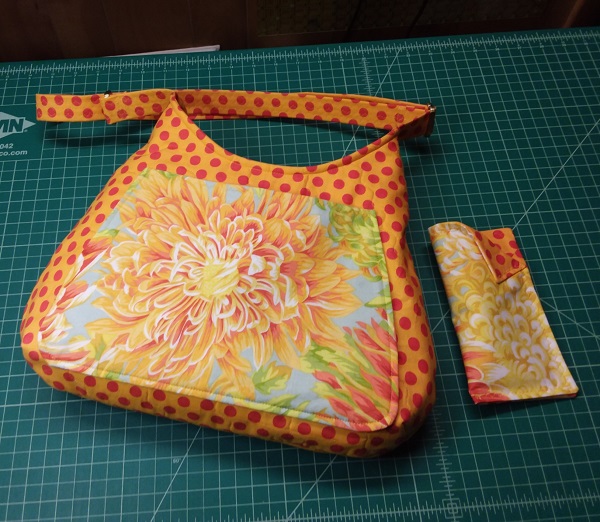
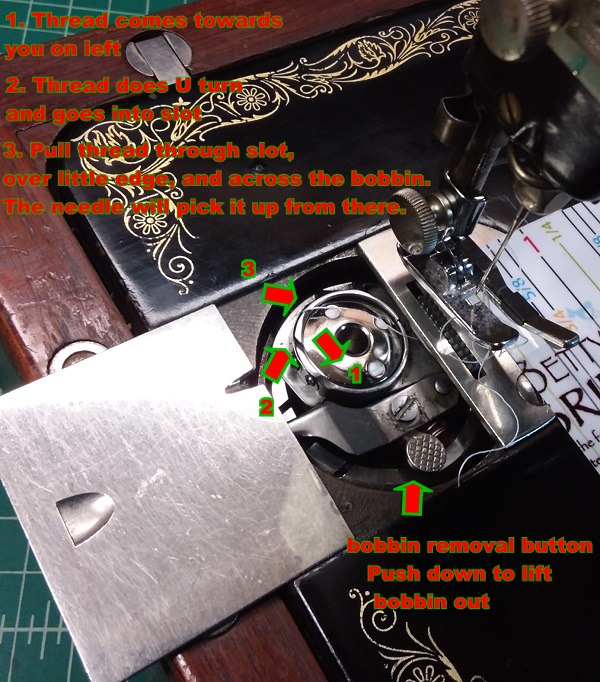
Pay no attention to the wonky thread path. I hadn’t read the manual yet. I always read the manual after. It makes more sense to me that way.

I am not quite done polishing, but I couldn’t wait to test her, so I oiled her everywhere. The first stitches were on paper towel to get everything moving again, adjust the thread tension, and the stitch length while letting that oil go where it needs to.

Now, after the first bobbin wind test, the vacuum cleaner belt did want to come off, so I removed the wheel, and applied some gel type super glue under it. I have since wound quite a few bobbins, and the belt has not moved.

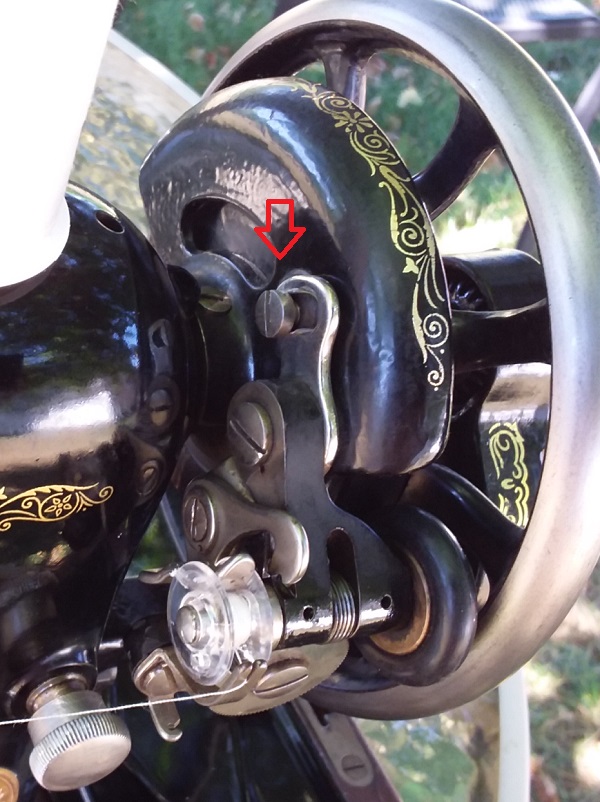
So, for those you may want to try this, You may already know that to remove the hand wheel, you simply back off the little stop screw as much as neccessary [tip :place old towel under it so if it falls off, it won’t roll off the table], then unscrew the large hand-nut, and stop motion washer will probably fall off at this point. Then the big hand wheel should ease on out.

To re assemble, you first need to know what position to place the stop motion washer [or clutch], and I can tell you as long as the two inside fingers are sticking out, you have a 50/50 chance of getting it right.

Singer_99_StopMotion_Position_02

The tricky part is that the 3 outer fingers are in different positions. One way will work and the other way will not.


Start by orienting the two notches in an “east – west” postion. This makes it more likely to stay put while you screw on the big hand nut, and it will help if you have to turn the stop motion washer.
Simply screw on the large hand nut, and see where the little stop screw hole lands. You want it to land right in front of [or on left side of] one of the outer fingers.

Singer_99_StopMotion_StopScrew_LandingPoints

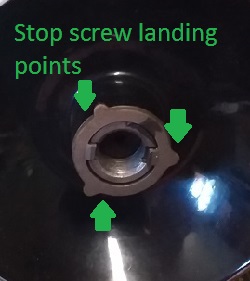
If it does, you are done, go ahead and screw the little bolt in. If you can’t peek, the just try to screw it in anyway. If it won’t go all the way, you are probably lined up with one of the fingers.
If it doesn’t end up on the left side of the finger, remove the large hand nut, then remove the stop motion washer, and carefully turn the stop motion washer 180 degrees. [position 2 shown above] Then screw the large hand nut back on.

Now test it!

One more * gasp * thing. Mine did not effectively disengage in either postion – until I used the stop motion washer that went to the spoked handwheel. These machines are a mechanical marvel for their time – and  ours. They are finely tuned, and this one wanted the washer that went with the spooked wheel. So if you do this swap, you want to use the washer that belongs to the handwheel you are using. The difference is slight, but it can be enough to cause it not to work properly.

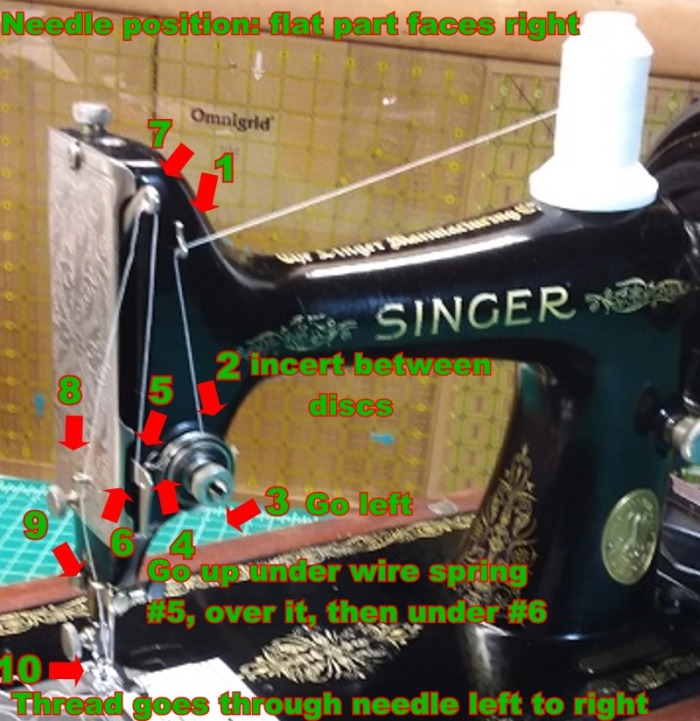
Singer 99k Threading directions:

This bobbin winding diagram shows a model that does not have a thread guide on the bed. Some later models will, and that will still be  #2 in your thread path, but on the bed near the serial number instead.

Singer99_Thread_Path_BobbinWinding2

Because the bobbin hides what really goes on, I removed it and enlarged the picture.

Singer99_Thread_Path_BobbinWinding_enlarged2

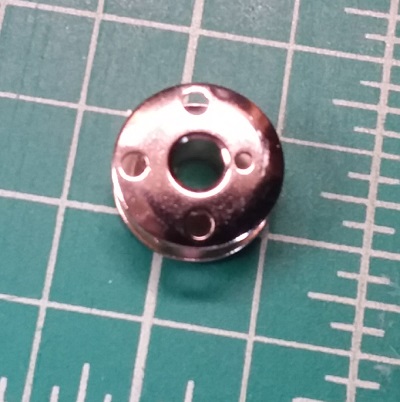
The bobbin drops in nicely. If it doesn’t, don’t force it. It could be the wrong one, or an inferior copy.

Singer99_Thread_Path_Bobbin_Install2

Ready to sew? This machine uses a standard needle, and I use the “microtex” type for everything, except knits. The microtex is very sharp, and doesn’t put big holes in your fabric.  I put a size 80/12 in and got very good results.

Singer99_Thread_Path_Sewing2

Just sew you know, I bought some new Singer brand class 66 metal bobbins, and the first one I tried got stuck. It didn’t drop in nicely, and I had to push a little. Big mistake. I had to pry it out, in a manor which wouldn’t damage the machine. It did damage the cheap piece of crap bobbin however.  Remember if it doesn’t fit, you must quit!

Singer99_New_Bobbin_Singer

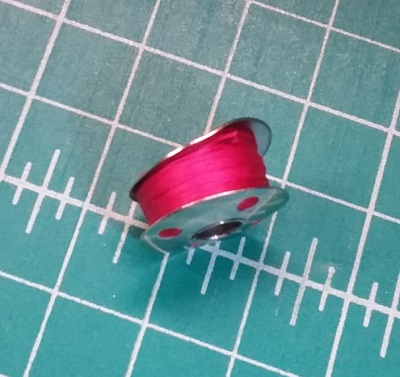
The bobbin below is a Dritz brand metal class 66 bobbin, and it fit nicely and sewed nicely. Buy vintage if you can, or buy the Dritz brand for now. I hope they don’t change to whoever made those new cheap singer ones!

While we’re at it, see the smaller hole near the center? That is what you want to incert the little post [see enlarged bobbin winding picture above] into when winding the bobbin.

Singer99_New_Bobbin_Dritz

This should get you going, and on to having fun!

Singer_99_Joy_Outside_01

As I write this, I can’t wait to get under that apple tree again,
– with fabric this time!

#JoyUnderTheAppleTree #HandCrankConverstion #Singer99HandCrank


Finished! Circle Bag for Rotating mat

Finished! Circle Bag for Rotating mat

I have at least 2 recent quilts finished, but took a break to finish up some other stuff. My job gets a bit busy in the summer, so I wanted to organise, before it gets too out of hand. What better way to organise than to finish up some abandoned projects?

Then my computer crashed a couple of times, and I decided it was time for a new hard drive. When I removed the old ones [yes, I had 3 drives stuffed in there] they were dated 2006, 2008, and 2011, so I guess it was just time.  Sew while windoze was loading, and updating, and updating, and updating . . . I cleaned, and sewed.

The first one was this bag. Way back when, I made a bag for my rotating cutting mat, but didn’t like the zipper.  I removed it, [Rip As You Go?], but did nothing else to it , until it taunted me into submission. Or maybe hubby wanted his office chair back. Anyway, it’s done!

Bag_Rotary_Cutting_Mat

I am sew loving this 22″ long double zipper!

A couple notes on how I did it:

I measured the mat, then added 1 1/2″ to the diameter. That makes 15 1/2 so I made a circle that big, and used it for my template. Then I quilted the pieces to some heavy interfacing. Same for pockets, except I made a cut out, trimmed with bias binding to finish. I added the handles to the bag inside the pockets to hide the attachment.

I installed the zipper into 4 strips 2 /12″ wide and about 2″  longer than the zipper.  This zipper panel turned out to be 5″ wide. I added heavy interfacing and quilted it, too.

Then I took the diameter of the quilted circles, subtracted 1″ for the two 1/2″ seam allowances, and used Pie [3.14] to get the circumference which was just under 48″. After that, I made the last panel the same width as the one containing the zipper, and added it to make the circle measure 48″ I used a ton of pins to attach my ring, one side at a time.

Bag_Rotary_Cutting_Mat_02

A large outside pocket on each side, and one on the inside.

  • Looks like it’s sticking it’s tongue out at us, doesn’t it?

Bag_Rotary_Cutting_Mat_03

It holds the mat, and quite a few tools.

Bag_Rotary_Cutting_Mat_04

and of course it matches my Featherweight tote.

FW_Case_Tote02


#CircleBag #RotatingMat

Baby Sings the Blues -Singer 348

Baby Sings the Blues -Singer 348

I went to a quilt show with some of my Playdate friends, and there was a lunch downstairs, along with some group displays. Sounds innocent enough, but my enabler friend directed my attention to a group table that had a sewing machine in need of a new home. It was blue, and even though my “Betty” White is blue, I don’t have a blue Singer. We were going to a nearby quilt shop after, and I was on a * gasp * budget, so I told the lady, I would have to wait a bit. I only ended up spending about $20 at the quilt shop, so I had $25 left. I went back to the little table, where the lady had practically begged me to take this sad little machine home with me, so I offered her the $25 and sealed our fates. The  blue case was made of plastic, that had large cracks on every corner, and I was strongly encouraged to hold it from the bottom.
I hugged her tightly and named her “Baby Sings the blues” before I even got her in the car.
Once home, I waited until Hubby went out to the shop. Then I steathly carried her from the car to my sewing table, and removed the case. There she was, all wide eyed and waiting to show me what she could do. Like a puppy saying “Im so happy you chose me!” Well, she sewed so pretty, that I couldn’t put her back in that case. The bottom was broken too, so I just took her completely out.

Singer_348

Now I usually employ old suit cases to store [hide] my machines, but Baby deserves better. I would look for a crappy machine to liberate from it’s case at a thrift store soon, but having spent all my money, I couldn’t go just yet. I figured it would take several stops, at several thrift stores to find, but I was going to try anyway.

About a week later, I was driving home, and saw it.
A machine case by the side of the road!!!!

It was rather beat up, and contained a Singer 758 better known as a “touch and throw” – EXACTLY what I wanted. I knew I wouldn’t be tempted to refurbish one of those.


Case_from_758Case_from_758_03

I never refinished a case before, but I won’t let such details stop me.
Mod Podge to the rescue! I have an entire tote dedicated to sewing themed fabrics.

Of course I do!

I picked out some background fabric, and sanded the loose bits of the case down, leaving most of the original covering on it. Then I brushed on the Mod Podge, and wrapped it. First the sides. Then I traced the ends and made a template to cut the end fabric pieces.

The hardware was secured with rivets, so I left the hardware on except for the pieces on the ends of the top. Those pieces had a gap that would reveal the original covering, so the rivets got drilled out, and replaced with nuts and bolts. I used an exacto blade to cut the fabric around the other hardware pieces.

Case_from_758_Recovered_02

but I wasn’t done yet. I have to jazz her up. Of course I do!

Lets give her house a touch of Philip Jacobs . . .

Singer_348_Baby_Case_02

and make her a bag for the foot petal, manual, and box of bits.

Singer_348_Baby_Case_Bag

Did I once buy a roll of thick vinyl? Of course I did!

Singer_348_Manual_Bag

Complete!

Singer_348_Baby_Bag_02

and now Baby is where she belongs when she’s not out playing.

MyGrain – For That Teenager

MyGrain – For That Teenager

I had made my daughter a quilt about 10 years ago. In my haste to finish it before Christmas, I turned it into a duvet. It was a giant Dahlia in her high School colors, and I only quilted the Dahlia part.
After seeing her watch me finish a quilt for my Sister’s Daughter this past Christmas, I thought it was about time I made her a real quilt. I asked my Daughter what her favorite color is, and she answered green. My mental inventory went to my greens where I remembered I had a lively green paisley print. It was a more modern paisley with cleaner curves, with black and turquoise hues mixed in. As as they danced in my head, I got another text from her that she also liked red. A lot.
* sound of brakes screaching * What?
Who’s thinking Christmas?
Not me.
Teenagers!
Even though she’s not a teenager anymore, she’s hard to please. I could never buy her clothes. How can I possibly make something she’ll like enough to use?
I went out to my stash, and discovered that I didn’t have any modern reds.
I am currently doing another quilt, and discovered I like doing drunken path blocks. Since I am waiting on a few mores pieces of fabric to arrive, I’ll just do Brats quilt now.
I drew out the blocks, and thought, lets shake things up a bit by piecing the pie wedge, but not too complicated, and make the seams at least an inch from the corners to make it easier to sew. and of course asymetrical, because she is anything but symetrical.
Well here it is, and I’ve named it MyGrain.

MyGrain_Finished_600
Why not? She has given me plenty of headaches, and so has this quilt. Oh, the piecing was the easy part. Designing it, not so much.

The backing is “Anything Goes” by Benartex.

MyGrain_Fabrics_back
I think I rearranged it a dozen times before I stayed in love with it. Kinda like our relationship.

I know she likes music, so I tossed in a white print with very subtle music notes just for her. Think she’ll notice?

MyGrain_Fabrics_Corner

and that crazy red dot fabric is so unexpected! Just like her.

#AnythingGoes #MyGrain #BratsQuilt

Bordered 9 patch from a jelly roll for the LBL

Bordered 9 patch from a jelly roll for the LBL

Once again, I needed a break from the quilt I am working on, and I watched one of Jenny’s Videos.

Bordered 9 Patch

Jenny  shows us to make this block with nine 2.5″ square pcs cut from strips, and I wondered if I could strip it. The answer is “sort of” So once again, I found some ugly fabric [it’s embassassing that I didn’t have to look that hard] and played around.

Bordered 9 patch from a jelly roll for the LBL aka “Little Bit Lazy”

Bordered_9Patch_Finished1

The result is a 10.5″ block which will be 10″ when sewn into a quilt.
Since each strip makes one block, if you do all 42 strips, you can make a 6 row, 7 column quilt which will be at 60″x70″ before borders.
The background requires only 20.5″ per block, so you only need half that amount or 21 strips from 1.5 yards of fabric.
Add 8 more background strips [2 1/4 yards total including background] if you want an inner border with background color, making the quilt now 64″x74″ before the outer border.
There is very little waste – just one pc that can be trimmed to 2.5″ and put aside for a scrappy project. It’s like getting a mini charm pack for free!

*Instructions are per block*

From one print [or jelly roll] strip:
Cut four 6.5″ long pcs, one 2.5″ pc and one 10.5″ long pc [I cut my 6.5″ pieces with it folded so you see 2, but there are 4]

From one of the background strips:
Cut four 2.5″ pcs, and one 10.5″ long pc

Bordered_9Patch_Cut

Sew the 10.5″ print and background pieces together, and press to the print.
Then trim the end, and subcut into four 2.5″ 2-patch pcs.

Bordered_9Patch_Cut2

Arrange into 9 patch using the lonely print 2.5″ square

Then take 2 of the 2-patch pieces and sew them so the opposites match, making a 4 patch.
Take one of the 2-patch pcs and sew the 2.5″ print square to the side with the background, making a 3 patch that oriented like “print-background-print”.

Bordered_9Patch_Sew

Take the remaining 2 patch and sew it so the opposites match, making a 6 patch.

Bordered_9Patch_Sew2

Sew the 3 patch to the 6 patch making sure the prints are on all 4 of the outside corners.

The back now looks like this. I supose you could do the swirly thing at the intersections, but I am a little bit lazy, so . . .

Bordered_9Patch_Press1

Next you want to arrange the two 6.5″ prints on each the side of your 9 patch, and the 4 background squares in the corners.

Bordered_9Patch_Sew3

Then begin sewing the 6.5″ strip to one side of the 9patch
I always try to press to the side with the least number of seams, so that would be toward the 6.5″ strip.

Then sew the 2.5 background squares to one end of the other two 6.5″ prints.
Press these two towards the print to nest when you sew them on to the block.

Bordered_9Patch_Sew4

Repeat for the other 6,5 strip, and the last 2 background pieces, making 3 rows.

Then sew the 3 rows together to finish the block.

Bordered_9Patch_Finished1

I cringed and made two of these blocks to show you the backs. Yes, that means I had 2 of these ugly strips!

Bordered_9Patch_Back

Since the pattern is symetrical, when you sew these into a quilt, you should make your odd numbered rows [1,3,5 ect] with the seams pressed out at the top and bottom, then arrange the blocks in the even numbered rows [2,4,6 ect] by turning them 90 degrees [one corner turn] so that those seams will be pressed in at the top and bottom. Then when you sew your rows together, they will nest.

Bordered_9Patch_Back2

What does one do with 2 Bordered 9 patch blocks made with ugly fabric?

Bordered_9Patch_Finished2

I don’t know yet, but when there’s a call for ugly, I will have the answer.


#LittleBitLazy #Bordered9Patch


What can you do with 2 Charms?

What can you do with 2 Charms?

What can you do with 2 charms, or 5″ squares of fabric?

In my Feb sew sampler box, I got 2 cute charm packs and a pattern that instructed me to cut one charm into four 2″ squares and use them to snoball all four corners of a 2nd charm, then press open. Basically they are telling me to use 2 charms to make one 5″ block.

Lifes_A_Picnic

This seemed wasteful to me, since I know a 2.5″ snoball done with 2 seams can give me a 1.5″ bonus HST and I am not ready to mess with anything smaller than that.

Sew, while waiting impatiently for the delivery service to bring my fabric for the quilt I am suposed to be doing, I had to experiment. As usual, no pretty fabric was in peril at any time during this event.

RST= Right Sides Together [not that it matters here, but for when you use pretty fabric]

What the pattern wants:
Cut Background charm into four 2″ squares, place RST on each of the four corners of the 2nd charm, sew all four corners diagonally, then trim 1/4″ away and press open.


– Result is one 5″ block called a snoball with a bit of fuss and a lot of waste.

Since I don’t like wasting either my charm or my pretty fabric, let’s play!

Option 1
Cut Background charm into four 2.5″ squares, place RST on each of the four corners of the 2nd charm, sew all four corners diagonally, then trim 1/4″ away and press open. Before trimming the corners off, you can sew 1/2″ away from the 1st seam, and get four bonus tiny HST’s that will trim to 1.5″.


– Result is one 5″ block simular to a snoball plus four 1.5″ HST’s – a bit less fuss since the pieces are bigger, and a lot less waste. The “points” on the 5″ block will be sewn into a seam, and therefore lost, making it look more simular to the block that the pattern features.

Option 2
RST – sew around all four sides, then cut ONLY the background 2x diagonally, and press open. Trick: You will want to draw your 2 diagonal lines before sewing, and place a bit of batting in the middle to make it easier to pull apart and cut the background layer.


– Result is a 6″ block called “Exploding” that looks like a square in a square, but without the points, and virtually no waste. I actually made a Exploding Block [Head] quilt using this techique.

Granted the pattern is for a table runner, but if you were making a quilt, you’d probably want that extra inch per block. 2 charm packs done this way, would get you 42 6″ pices making a 6 row, 7 column quilt that is 33″ by 38.5″ as opposed to the 27″ by 31.5″ you’d get with the 5″ blocks.

Charm_Snoball_Compare_Waste

Above is the waste without making the tiny HST’s in option 1.

Now, armed with a little bit of knowledge, a rotary cutter and some more unquiltworthy fabric . . .

I’m going to title this next segment “Just because we wanna know what else 2 charms can do”

Option 3 – just because
RST – sew around all four sides, then cut 2x diagonally.


– Result is four 3″ [trimmed] blocks that can be sewn into a 5.5″ block.

Charm_Snoball_Op3_04


Option 4 – just because
RST – sew down two opposite sides, then cut once diagonally.


– Result is two Quarter Square Triangles exactly the same that can be turned and sewn into a 6″ hour glass block.

Charm_Snoball_Op4_03

You can also use this to make A Quarter Square Triangle Block.

Option 5 – just because
RST – sew on both sides of one diagonal line, then cut on the diagonal line.

Charm_Snoball_Op5_01
– Result is two 4.5″ HST’s

Charm_Snoball_Op5_02
Do it twice, and sew four together to get 8.5″ block from 4 charms.
By the way, I pinned my notes to my samples so I don’t have to do this again.

Option 6 – just because
RST – sew down two opposite sides, then cut once down the center, between the seams.


– Result is two 4.5″x5″ blocks that could be trimmed to 4.5″ square and used for rail fence.

Charm_Op6_03


Option 7 – just because
RST – sew down two opposite sides, cut once down the center, like above.

Then turn each piece, cut down the center again.

Charm_Op7_03

Arrange opposite colors, and sew it back together.
– Result is two 4.5″ 4 patch blocks

Charm_Op7_04


Option 8 – just because
Draw 2 diagonal lines in each direction on the back of the lighter piece, then sew 1/4″ away from the lines on each side. Then cut between the lines Plus in the center in both directions – called Magic 8


– Result is eight 2″ HST’s that can be sewn into two 3.5″ blocks.


Option 9 – just because
Draw 1 diagonal line on the back of the lighter piece, then sew on this line and then sew another line 1/2″ away.


– Result is one 5″ HST block and one 4″ HST block.

Charm_Op9_03
Not sure why you’d want two different sized blocks, but this does show that when you snoball a corner, you can get a bonus HST that is one inch smaller than the snoball square you used.

Option 10 Rectangular Snoball
Slice off 1 1/4 inch from 2 squares. I stacked mine.


Then slice that skinny strip 3 more times at 1 1/4″ so that you have four 1.25″ squares.
Switch the colors, and snoball all 4 corners of the remaining 3.75″x5″ pieces.

Charm_Snoball_Opt10_Sew

For best results, you may want to switch your stitch plate from the zig zag one that is probably on it, to the single hole one. I didn’t, and that’s why you see a wrinkly corners.
-Result is two 3 3/4″ by 5″ snoball blocks without a lot of waste.

Charm_Snoball_Opt10_Result

If you sew these together as shown, you’d get a 6 1/4″ by 5″ block.


So there ya go. You can now rest easy having some clue of just how far a charm pack or two will get you.

Have a charming day~!

#TheyDontCallMePrettyCuriousForNothing #CharmPackHack #TooCharming